The Snipping Tool is in Start > All Programs > Accessories; you can also just open the Start menu and type "Snipping Tool" (without the quotes), followed by Enter.
The moment you open Snipping Tool for the first time, your whole screen may become faded as soon as the tool's window appears. Don't worry, nothing has gone wrong. If you want to get rid of the faded-ness, just hit Esc. Now in the Snipping Tool window, click on the little triangle next to the New button, and choose how you want to snip your screen.
- Free-form Snip - choose this, and your screen will become faded again (don't worry!) Your cursor would have also turned into a pair of scissors. Now, simply drag your cursor around an area of your screen which you want to snip. When you release the mouse button, a window with the snipping will appear. Personally, I don't find this snipping method useful (who wants a blob-shaped print screen?)
- Rectangular Snip - like the free-form snip, except this time, you draw a rectangle around the area which you want to snip. Much more useful in my opinion.
- Window Snip - this one is fun - you click on any window or dialogue box which you want to snip - that's all. No need to manually draw a rectangle around it to snip. One thing to take note of: if you click on a window which is covered by another window on top, the covered part will still be covered in the snipping - i.e. it won't show underneath.
- Full-screen Snip - how more obvious can it get. This will capture your entire screen, minus the mouse cursor though.
 |
| A rectangular snip in process. |
 |
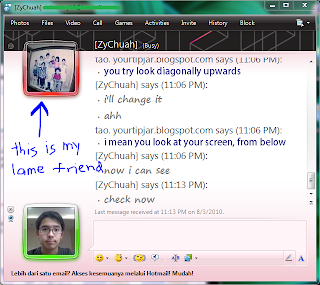
| Annotating your screenshots can really make them more fun and interesting for whoever that is going to see them. |
When you're done annotating, click on Save or Copy. If you are saving the file, take note of the file type in which you are saving. For most people, JPEG should do. GIF is not advised because it limits the number of colours that can be saved, which might distort or make your lovely screenshot ugly. If you don't care about how big the file size might turn out, choose Portable Network Graphic file (PNG), as it gives the best quality.
You can tweak some of the options in Snipping Tool. In the window which appears after you have snipped something, click on Tools > Options. Apart from that, enjoy making pretty screenshots, be it for your blog, a presentation, or to show something funny that popped out on your screen.

No comments :
Post a Comment
All comments are subject to moderation. If you don't want to sign in, comment as "Name/URL".